Frozen Fish to Baked Fish Smothered In Salsa…Only 30 Minutes

Until this past year or so, I typically left the cooking of fish to restaurants. One afternoon, I was aimlessly walking through the grocery store trying to decide what to cook for dinner that day when I found myself in the fish section of the market. None of the fresh fish in the display counter looked appealing so I began to stare at all of the packages of individually frozen fish filets (not your mother’s fish sticks) in the freezer display. I was amazed how much selection was available.

Salsa Baked Fish

Baked Fish Filet Smothered with Salsa

For this first purchase, I selected a package where each fish filet was individually packaged and there was extensive preparation / how to cook information on the package. Since then, I purchase packages of individually frozen fish that has less packaging instructions, the filets are loose in the bag and in turn costs less.

The following recipe is almost too easy and even after having made this dish dozens of times, I am still surprised how simple and quick it is to make.

Frozen Fish Filets with Drizzled Olive Oil and Kosher Salt

Frozen Fish Filets with Drizzled Olive Oil and Kosher Salt

Fish Covered in Salsa

Frozen Fish Filets Covered in Salsa

Baked Fish with Salsa

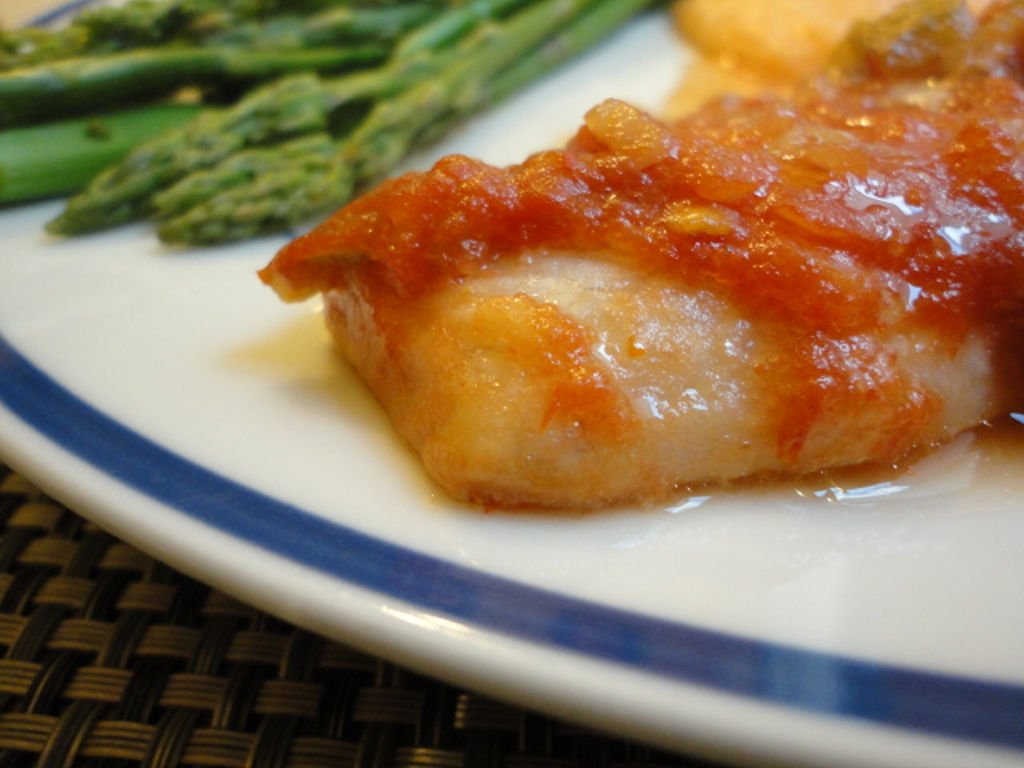
Salsa Baked Fish (25 minutes later)

Ingredients:

  • 4 to 5 Individually Frozen Fish Filets (your personal choice of the fish: Cod, Haddock, Tilapia, Swai, Catfish to name a few)
  • 16 Ounce Jar of Salsa (you select the Brand and Heat Level), or homemade salsa
  • 3 Tablespoons of Olive Oil
  • 2 to 3 Pinches of Salt (optional)
  • 9 inch x 12 inch Pyrex Casserole Dish


Instructions:
Total time: 30 mins

  1. Preheat the oven to 450 Degrees Fahrenheit.
  2. Drizzle half of the Olive Oil onto the bottom of the Pyrex Casserole Dish.
  3. Place the Frozen Fish Filets in the Pyrex Casserole Dish. Depending on the size of the Filets, you should be able to space 4 – 5 filets. If not, prepare another Pyrex Casserole Dish.
  4. Drizzle the remaining Olive Oil over the Fish Filets.
  5. Sprinkle the Salt over the Fish Filets (optional).
  6. Evenly pour the Salsa over the Fish Filets.
  7. Place the uncovered Pyrex Casserole Dish on the middle rack in the oven and baked for 25 minutes.
  8. When 25 minutes have passed, remove the Pyrex Casserole Dish from the oven and serve.

Typically, I serve the fish baked with salsa on a bed of white steamed rice or some other variation of steamed rice that has been cooked with a bouillon cube and maybe some vegetables added. If I am not feeling the desire for rice, then I will make my Fiesta Style Cheesy Grits. Steamed vegetables also are very nice with this meal and the overall dish is very light, flavorful and so easy to make. Very little mess in the kitchen and with so few ingredients it is still a very flavorful meal to prepare in 30 minutes.

I still have that first empty package of fish in my freezer so when I have a lapse in memory I can refer to the cooking instructions.

Chicken Salad with Mango, Mint and Cilantro Dressing

Mango, mint and cilantro (fresh coriander) dressing is now my new favourite salad dressing for this summer. It may not look like it at first glance, but it is basically a vinaigrette, which mango, mint, cilantro and curry powder as the additions. As it has such complex flavours, the salad leaves should be something like arugula (rocket) or watercress because of their ‘peppery-ness’ to be able stand up to it. The consistency of the dressing is thick and creamy, not unlike mayonnaise and could be a perfect replacement for anyone watching their weight or doesn’t like mayo.

This dressing would also go well with fish, pork or just salad.

Mango, Mint and Cilantro Dressing

Ingredients

  • 1 ripe mango, peeled and pitted
  • 1 handful of cilantro (fresh coriander)
  • 2 tbsp of olive oil
  • Juice from half a lime
  • 1 handful of fresh mint leaves
  • 2 tbsp of mild curry powder
  • Salt and freshly ground black pepper

Method

Add all of the ingredients to a food processor or blender and fizz until smooth and creamy.

I served the mango, mint and cilantro dressing with grilled chicken that I had marinated in a basic vinaigrette overnight, and placed it on a bed of arugula (rocket), baby spinach and slices of avocado.

Mango, Mint and Cilantro Dressing

Chicken Salad with Mango, Mint and Cilantro Dressing

The simplest of salad dressings – Vinaigrette

As with most good food, you must start with good quality ingredients. This is equally true for even something as simple as a salad dressing, which a vinaigrette is as simple as it gets. Vinaigrettes are an emulsion of 3 parts vegetable oil (usually olive oil) and 1 part acid (usually vinegar or acidic fruit juice), seasoning, and sometimes other flavourings. The oil is the base to carry the flavour in a vinaigrette, so it is best to use a neutral oil, or a quality oil such as extra-virgin olive oil. Low quality oils or highly flavoured oils can have a negative effect on the finished salad dressing, so choosing a good oil is important. Acid is used for the base flavour in the vinaigrette, the most common are white wine vinegar or lemon juice, but vinegars such as apple cider, sherry or balsamic, and fruit such as limes and oranges, are also quite common. Again choose good quality vinegar or fruit.

When thinking of adding other flavours, other than just basic seasoning to a vinaigrette, it is best to remember that the goal of a good dressing is to create a balance of flavours that enhances the natural flavours already in the salad and not assault the taste buds with too much complexity. Common additions to the basic vinaigrette are minced shallots, Dijon mustard, chopped garlic, herbs, pickles and spices.

Simple French Dressing

Simple vinaigrette, with Dijon, before mixing

Basic Vinaigrette

Ingredients

  • 6 tbsp olive oil (extra virgin if possible)
  • 2 tbsp acid (e.g white wine vinegar)
  • Salt and freshly ground black pepper
  • Optional: To my everyday vinaigrette, I add half a teaspoon of Dijon mustard

Method

Eva Solo Dressing Shaker, Drip-Free

Drip Free Salad Dressing Shaker

Add the ingredients to a mixing bowl and whisk until you achieve a creamy emulsion. Pour over your salad, mix the salad leaves to coat thoroughly with the dressing and enjoy.

Alternatively you can use a bottle or a jar to mix larger quantities to keep for another time. Add the ingredients to your bottle or jar, Secure the lid and shake vigorously to make the emulsion. The ingredients will settle out and separate over time but you can easily make the emulsion again by just shaking. The only problem with a bottle or jar is that they do tend to drip when pouring and they may not look that great on your dinning table. I bought a non-drip salad shaker, which is not only great for mixing larger quantities of salad dressing, but it looks good on the table and best of all it doesn’t drip.

It is so easy and quick to make your own vinaigrette salad dressings, you’ll never need to buy another one again. Try experimenting with different oils, vinegars or acidic fruit juices to see how these affect the flavours already in your salad. Also try adding additions such as honey, cayenne, coriander seeds, grated Parmesan, crumbled Roquefort, chopped tomatoes, fennel, etc, etc.

Tip: As well as salad dressing, vinaigrettes made great marinades.


Southeast By Southwest…Fiesta Style Cheesy Grits

I did not grow up eating grits and the first time I did try grits was also the first visit to a Cracker Barrel. I cannot say that I was overly impressed, but I also did not have any problem finishing the grits that time or any time since then. Over the past few years I have begun to incorporate grits not as a breakfast dish, but as alternative to the more traditional starch components (pasta, potato or rice) of the dinner.

Quick Grits with Salsa and Pepper Jack Cheese

Fiesta Style Cheesy Grits Served with Salsa Baked Fish and Steamed Aspragus

Quick Grits

Quick Grits (5-7 Minutes To Prepare)

There is much conflicting information on the difference between Grits and Polenta; Color: White or Yellow, Processing: Lye versus No Chemical Treatment, Corn Type: Flint or Dent, Hull Ground: Yes or No, Grind Texture: Fine, Medium or Coarse and Cooking Time: Instant, Quick or Traditional. With all of that being said, I have been using Quick Cooking Grits (5 – 7 minutes) for many of the experiments with Grit side dishes.

Grits are an amazing median in which to impart flavors and additional texture to a meal that otherwise would be absent. The other night I was preparing fish baked with salsa and steamed asparagus and was looking for a starch to tie the dish together. I was looking to prepare a starch that was spicy, creamy, yet not a lead balloon in the gut.

Ingredients:

  • 4 Cups of Water
  • 1 Large Tomato Bouillon Cube with Chicken Flavor (any bouillon cube flavor would work well)
  • 1 Cup of Quick Grits
  • 1/2 Cup of Salsa (I used Medium Heat. If I had Chipoltes in Adobo Sauce I would have tried this flavoring)
  • 2 Large Handfuls of Shredded Pepper Jack Cheese
Fiesta Style Cheesy Grits Cooking

Fiesta Style Cheesy Grits in a Pot

Instructions:

  1. Add the bouillon cube to the water and bring to a boil.
  2. Add the Quick Grits, reduce the heat to Medium and stir frequently for 5 – 7 minutes.
  3. Add the Salsa and Shredded Cheese and thoroughly mix.
  4. Turn off the heat and allow the grits to set and cool for a few minutes.

To make Fiesta Style Cheesy Grits is this simple and yet the flavor and creamy texture would make you think that you spent more then the 10 minutes required to prepare this side dish. The only word of caution that I do have is that you will be inclined to eat all of the Fiesta Style Cheesy Grits. They are that good and border on being considered comfort food.

Spicy Cheesy Grits

Fiesta Style Cheesy Grits (Grits, Tomato Bouillon, Pepper Jack Cheese & Salsa)

Coronation chicken vol-au-vents

Vol-au-vents are little puff pastry cases invented in Paris around 1800 by Antonin Carême, known as the the ‘King of Chefs, and the Chef of Kings’. The name literally means ‘blown by the wind’. They have been popular in the UK as canapés and are fairly easy to get a hold of in most supermarkets, however I wasn’t able to find any in the US, but I was up for the challenge of making my own.

Coronation chicken was invented for the lunch to celebrate the coronation of Queen Elizabeth II in 1953, by a florist called Constance Spry and a chef called Rosemary Hume. The dish is said to be inspired by another dish called Jubilee Chicken for the Silver Jubilee of George V, the grandfather of Queen Elizabeth II. My recipe for the coronation chicken filling for the vol-au-vents is based on the taste of the original Rosemary Hume recipe, but simplified, since this is for canapés and not a main dish.

How to make Vol-au-vent Cases

Ingredients

  • Frozen puff pastry sheets
  • 1 egg
  • Plain flour (All purpose)

Method

First defrost the pastry sheets. On a clean, floured surface lay out the pastry, rolling it slightly if needed. Take a fluted, 2″ (5cm) pastry cutter, dip the edge into some flour (to prevent sticking) and cut out as many circles as possible. Lay the circles onto a greased baking sheet and using the tip of a small, sharp knife, gently score a smaller circle in the middle, but only about half way through. I actually used the metal lid from a gin bottle which was the perfect size and it had a sharp edge. Brush each pastry circle with an egg wash and cook in a 400F (200C) oven for about 20mins until the are risen and golden.

Scoring the lids for the vol-au-vents

Scoring the lids for the vol-au-vents

Remove from the oven and allow to cool on a wire rack. When the vol-au-vents are cool, use a sharp knife to extract the ‘lids’, which can be used to top the filling. Using something like the handle of a wooden spoon, gently push the pastry down into the vol-au-vent, making a space for the filling. If you don’t want to use the lid, you could just push it down into the space as well. Fill the vol-au-vents and serve.

Making the vol-au-vent holes for the filling

Making the vol-au-vent holes for the filling


Homemade Coronation Chicken Filling

Ingredients

  • Pre-cooked shredded chicken, or chicken cut into small pieces
  • 3 tbsp of mayonnaise
  • 2 tsp of mango chutney
  • 2 tsp of mild curry powder
  • Salt and freshly ground black pepper

Method

Mix together the mayonnaise, mango chutney and curry powder. Taste and add more curry powder if required and then season with salt and pepper. Add the chicken and mix to coat thoroughly. Spoon the mixture into the vol-au-vent cases and decorate with a sprinkling of chopped parsley.

Coronation chicken vol-au-vents

Coronation chicken vol-au-vents

Don’t Go!
Just Yet

Thanks for visiting. We know you love curry, but before you go, take a look at some other curry recipes.
SHOW ME MORE RECIPES
close-link