How to make shredded chicken

Until I came to the US, I hadn’t really come across shredded chicken to my knowledge, but it seems to be in a lot of Tex-Mex food such as tacos, enchiladas, quesadillas, fajitas, taquitos, etc, as well as many other dishes such as soups, sandwiches, stews, etc. However, recently when planning Coronation Chicken vol-au-vents, I thought I could make a big batch of shredded chicken, and also keep some for making chicken tacos later on.

The process for making shredded chicken is pretty easy. Essentially you poach chicken pieces in chicken stock and then shred them with a couple of forks. You could make shredded chicken from any part of the chicken, but split chicken breasts are usually very cheap, so I ended up using these, plus I re-used the carcass to re-charge some chicken stock for the freezer.

Chicken simmering in stock

Chicken simmering in stock

How to make shredded chicken

Ingredients

  • 3 large split chicken breasts
  • 2 pints of chicken stock

Method
Place the chicken breasts in a large pan. Cover with the chicken stock. Bring to the boil and then reduce to a simmer for about 40 minutes. Remove the chicken from the stock. Using two forks, hold the chicken breast with one, and shred the chicken using the other. Repeat for the other breast.

Shredded chicken

Shredded chicken

If you aren’t going to use the shredded chicken immediately, then mix a couple of ladles of chicken stock into the shredded chicken, to keep it moist, cover and then refrigerate or freeze it.

You can also add some vegetables and the chicken bones back to the chicken stock to re-infuse flavour and re-create the stock. See the post Making chicken stock is a great investment for instructions.

How and When to Make Sausage Links from the Sausage Coil

Although I am far from an expert in making homemade sausage quickly and without mistakes, there are a few techniques that I have learned that make the process easier. One of those lessons learned is when to make the individual links from the sausage coil.

You can stuff a casing with a sausage mixture by yourself; however it is an easier process working with another person. Likewise, once the two of you have a rhythm going, the last thing you want is to pause pushing the sausage mixture through the stuffing machine as the other person twists the stuffed casing into another link of sausage. Not only can this disrupt the process, but I have found that attempting to twist the coil into links as the casing is being stuffed creates links of unequal lengths.

Experience has shown that it is far easier to stuff an entire length of casing and then proceed to make the individual links. There are two important items to remember. The first is to not to over stuff the casing. If you do, despite the surprisingly elastic (stretching) properties of the casing, it will eventually split. The second is to not wait to twist the sausage coil into links. It is best to make the links while the casing is still wet and pliable.

Step #1: Stuff the casings until the entire sausage mixture has been used

Homemade Sausage Coil

Coil of Homemade Sausage (Bangers)

Step #2: Determine the desire sausage link length, press down lightly and begin to twist

Sausage Links Being Made From Homemade Sausage

Determine the Desired Length of the Sausage Link, Press Down at that Spot and begin to Twist

Step #3: Continue to Twist the Link an Entire Revolution (360 degrees)

Making Homemade Sausage Links

Continue to Twist the Link an Entire Revolution (360 degrees)

Step #4: Continue Twisting the Link for an Additional Complete Turn

Making Homemade Sausage Links from a Sausage Coil

Continue Twisting the Link for an Additional Complete Turn

Step #5: Repeat the process, until the entire coil has been made into links

Homemade Sausage Twisted into Links

Homemade Sausage that has been Twisted into Links

Practice makes perfect, well not exactly, but over time you will become more comfortable with the process. On occasion, despite your best efforts the casing will break. This is not a problem. Simply remove a small portion of the stuffed sausage from the casing and make a knot at both ends of the break. The little amount of sausage that is removed from the break in the casing makes for a perfect treat to be pan fried as a patty as you wait for your sausage to air dry in the refrigerator for twenty-four hours.

Of all the steps required to make homemade sausage, the actual process of twisting the coil of sausage into individual links is where I receive the most satisfaction that I have truly mastered the skill of making hand crafted homemade sausage.


Holy Crepe! – Excuse my French

I had a hankering for crepes recently and decided to make a large batch of batter for making sweet and savoury crepes. Crepes are very thin pancakes made from wheat flour, similar to their ‘cousin’, the galette, which is made from buckwheat, and both come from Brittany in France. Most countries have similar types of thin pancakes such as the pannenkoek from the Netherlands, or the Dosa from India, which is made from rice batter instead.

Crepe filled with strawberries and blueberries

Crepe filled with strawberries, blueberries and a sprinkling of powdered sugar

I make my crepes batter plain, so that I can add flavourings just before cooking such as herbs, sugar, etc. However even for dessert crepes I don’t add sugar to them, but fill them with sweet fillings and a sprinkling of powdered sugar before serving. The process of making crepes is very simple, but there are tips that will help ensure the best tasting crepes.

  • Don’t over mix the batter as this will increase the production of gluten and make them tough.
  • Refrigerate the batter for at least one hour. You can let the batter rest for up to 24 hours, but you may need to add a little water just before using, as the batter will thicken.
  • Use a heavy bottomed pan to ensure even cooking
  • Ensure that the pan is at a steady hot temperature before cooking. They will stick if it is too cold and burn if it is too hot.
  • The first crepe will never be perfect, so slightly over butter the pan to begin with. This will ensure that the pan is properly buttered for the next one.
  • Resist the temptation to flip the crepes too early. Wait until the edges start to brown before flipping

Ingredients

  • 3 eggs
  • pinch of salt
  • 0.75 cup (100g) of plain flour (all purpose)
  • 1 cup (250ml) of chilled water
  • 1 tbsp of melted butter

Method

  1. Add all of the ingredients to a bowl and whisk together, but not too long. Alternatively you could use a blender for a couple of seconds to mix.

    Crepes Ingredients

    Crepes Ingredients

  2. Cover and refrigerate the batter for at least one hour. Before cooking check to see if the batter is of the right consistency. It should be like thin cream, if not then add a little water to thin it out. At this stage you could add things such as chopped herbs for savoury crepes or sugar and vanilla for sweet crepes.

    Crepe batter

    Crepe batter

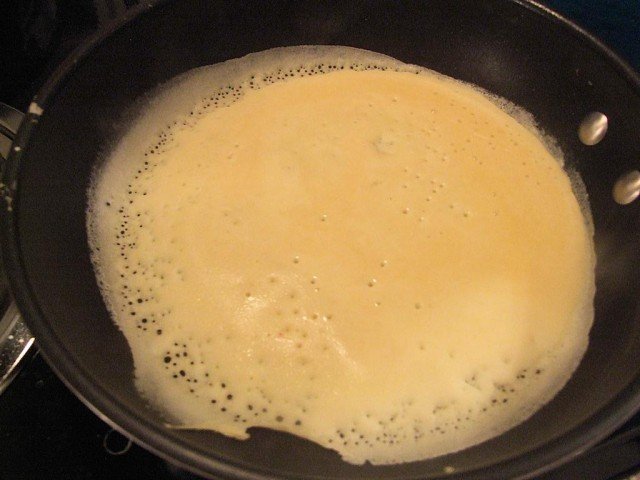
  3. Heat the pan (7.5″ or 19cm base) to medium high, then lightly butter it. Using a small ladle (~ 3 tbsp) add the batter to the pan, and gently swirl it to ensure even coating around the pan. Cook the crepe until the edges just start to brown and then flip the crepe using a spatula, or just by using the pan if you are brave.

    Crepe ready to flip

    Crepe ready to flip

  4. Cook the other side for roughly 30 seconds.
  5. Transfer the crepe to a plate, by just sliding it out of the pan. You can keep the crepes warm in a low oven until you are finished cooking the rest or cover them with a clean tea towel.
  6. Re-apply butter to the pan and repeat the process.

For a simple dessert, fill the crepe with some fresh fruit or just sprinkle on some lemon juice, roll and then sprinkle with some powdered sugar. Or try the Crêpe Suzette, by pouring a sauce made from butter, sugar and Grand Marnier over a crepe.


Easy, Quick and Simple Linguine with Red Clam Sauce

Linguine with Red Clam Sauce is a traditional dish for our family on Christmas Eve. However there are times during the year where I am craving this meal and the chances of finding Little Neck Clams at a grocery store or seafood market is virtually impossible. An alternative and a very good one at that is a Red Clam Sauce that from start to finish has you eating in 60 minutes from the start of preparation. All that is needed for this meal is some forethought when you go to the grocery store in order to have all of the ingredients needed.

Ingredients for Easy, Quick and Simple Linguine with Red Clam Sauce

Ingredients for Easy, Quick and Simple Linguine with Red Clam Sauce

Whole Baby and Chopped Clams Combined in a Bowl

Whole Baby and Chopped Clams Combined in a Bowl (Juice Drained and Saved)


Julienne Fresh Basil in a Bowl

Julienne Fresh Basil in a Bowl

Ingredients:

  • Olive Oil
  • 4 – 8 Peeled Whole Garlic Cloves
  • ½ Tablespoon of Salt (Sea Salt preferred)
  • ½ Tablespoon of Sambal / Red Pepper Flakes (1 Whole Red Chili Pepper sliced in half, the spiciness is optional, but it does provide a nice subtle contrast the sweetness of the clams)
  • ½ Cup of Red Wine
  • 8 Ounce Bottle of Clam Juice
  • 10 Ounce Can of Whole Baby Clams (drain the juice and save)
  • 6.5 Ounce Can of Chopped Clams (drain the juice and save)
  • 10 – 20 Fresh Basil Leaves (sliced into thin strips – julienne)
  • 26 Ounce Container of Strained Tomatoes (An alternative tomato product can be used, but I prefer to use Strained Tomatoes)
  • Grated Italian Cheese
  • 1 – 1 ½ Pounds of Linguine
Red Clam Sauce before Clams Added

Red Clam Sauce Simmering on Stove before Clams added

Instructions:

  1. In a large deep skillet drizzle the Olive Oil and add the Salt.
  2. When the Olive Oil is hot, add the Whole Peeled Garlic Cloves, stirring them until they are golden brown.
  3. Add the Red Wine and Sambal (Red Pepper Flakes or Chili Pepper)
  4. When the Red Wine comes to a boil, add to Strained Tomatoes and bring to a boil.
  5. Add the bottle of Clam Juice and the liquid saved from the drained cans of Whole Baby Clams and Chopped Clams.
  6. Stir and reduce the heat to Medium-Low and allow the sauce to simmer for 30 minutes, stirring occasionally.
  7. Bring a large pot of water with salt added (to quicken the boiling time and season the pasta) to a boil and add the Linguine. Follow the instructions on the container to cook the Linguine “al dente” style.
  8. After the Linguine has been added to the pot of boiling water, lower the heat on the sauce to Low.
  9. Just before the Linguine has been cooked “al dente”, add the Whole Baby Clams, Chopped Clams and Basil Leaves to the sauce mixing all of the ingredients together.
  10. When the Linguine is finished boiling, drain the pasta well then add the Linguine to the sauce. Increase the heat to High and thoroughly mix the Linguine and the Red Clam Sauce together so that the pasta is well coated with the sauce.

You can add grated Italian cheese to the top of the Linguine in your plate, but the brininess of the clam juice and the initial salt added should provide more than enough seasoning for the meal.

Linguine with Red Clam Sauce Finishing Off in a Skillet

Linguine with Red Clam Sauce Finishing Off in a Skillet

Although there are no opened clams adorning this meal, the flavor of this quick and easy Red Clam Sauce is just as flavorful. The dish is a perfect balance of the brininess of the sea combined with the sweetness of the clams with just a little amount of heat to bring it all together.

Quick & Easy Red Clam Sauce with Linguine on a Plate

Quick & Easy Linguine with Red Clam Sauce on a Plate


A taste of the Raj – Kedgeree for breakfast

Kedgeree is a British breakfast dish consisting of smoked fish, boiled eggs and curried rice. Though it doesn’t initially sound like a British dish, smoked kippers have long been a part of British breakfasts and as I have mentioned before, curry is truly the national dish of the UK. During the time of the British Raj in India, kedgeree was a staple of the British breakfast and it was probably developed by adding fish and eggs to Khichri, which is an Indian dish made from rice, lentils (dalh) and spices. However historians have also traced kedgeree’s origins back to recipe books from Scotland in 1790, which would suggest that kedgeree was taken to India by Scottish troops before returning back to Britain. Another clue might be that it came from the port town of  Kedgeree (now Raichak) during the Raj, south of Calcutta (Kolkata) on the mouth of the river Hooghly, were they used kedgeree pots as floats for their fishing nets.

Kedgeree Ingredients

Kedgeree Ingredients

There is no agreed recipe for kedgeree other that it contains smoked fish, rice, eggs and curry spices, but there are many variations including adding sultanas, using ghee instead of butter, or using some other fish instead of smoked haddock. Smoked mackerel or smoked salmon can be used if haddock isn’t available, but I prefer it with smoked mackerel, which I smoke myself and keep in the freezer until I need it. Because it is a hearty meal, kedgeree is probably best as a late breakfast or brunch on lazy Sunday mornings with lashings of tea and toast.

Ingredients

  • 0.5 cup (100g) of basmati or long grain rice
  • 2 fillets of smoked haddock or mackerel, flaked into pieces
  • 0.5 cup (100g) of frozen peas, thawed
  • 2 eggs, boiled and quartered
  • 2 oz (60g) of butter
  • 1 onion, chopped finely
  • 1 tbsp of curry powder (mild or hot depending on taste)
  • 1 tsp of chilli powder
  • 1 tsp of ground turmeric
  • 1 tbsp of chopped parsley as a garnish
  • Salt and freshly ground black pepper

Method
Cook the rice and allow to cool. Gently sauté the onions in the butter until they start to soften. Add the spices and allow them to cook for a minute or so to release the aromatics. Add the rice and mix with the spices and onion. Allow the rice to gently heat. Add the peas, eggs and fish, mix and allow to heat for a couple of minutes. Season with salt and pepper. Serve and garnish with a little parsley.

Kedgeree

Kedgeree

Don’t Go!
Just Yet

Thanks for visiting. We know you love curry, but before you go, take a look at some other curry recipes.
SHOW ME MORE RECIPES
close-link