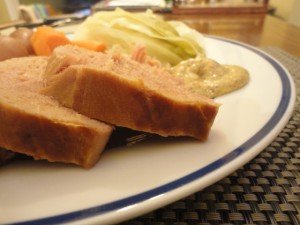
New England Influenced Slow Cooked Ham & Vegetables

Ham, Cabbage, Carrots & Potatoes #1Ham, Cabbage, Carrots & Potatoes #2Ham, Cabbage, Carrots & Potatoes #3Let us be honest, most meals in a crock pot (slow cooker) are either over cooked, too salty or fall well short of the vision we had imagined when we first read the recipe. As a means of convenience, the slow cooker is a great innovation from the early 1970’s that played into the overall demise of cooking from scratch (TV Dinners, Sloppy Joe Mix and everything can be Casseroled). Despite many of the negative connotations associated with slow cookers, there is a time, place and even specific meals that do very well in a crock pot.

Personally I have had limited success with slow cookers. There is however one category of meals that I have successfully mastered in using this no fuss, no mess walk away means of preparing food. That success centers around cured meats, specifically corned (brined / pickled) beef and commercially cured hams. Most of us are familiar with eating corned beef, cabbage and carrots around St. Patrick’s Day. More often then not, a slow cooker was used to prepare the meal. There is not much difference in the end result of a corned beef versus a brine cured ham. Both have been injected / vacuum marinated to allow the primarily salt solution to be fully incorporated throughout the entire piece of meat. The net result is what would otherwise be a tough chewy cut of meat has now been tenderized.
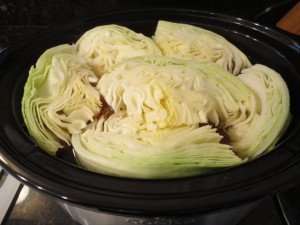
Cabbage in a Slow CookerI remember growing up eating what was known as a Picnic Ham that had been boiled with carrots, cabbage, potatoes and was served more often then not with only a little amount of broth on a plate. Living in Houston, TX is is difficult to find a Picnic Ham at the grocery store. A Picnic Ham is also known as a Boston Butt or Pork Hand. A viable alternative is a personal sized deboned ham.

As Spring in Houston fast approaches which means that the air conditioning will be going on soon, the desire to eat soups and stews diminishes. It was time to pull out the crock pot and prepare a slow cooked ham and vegetables. This meal is deceptively simple and despite being cooked for hours the flavors are subtle yet fully developed. In my opinion what makes this meal so pleasurable is that the saltiness of the ham while submerged in the water during the cooking process is drawn out flavoring the vegetables, reducing the saltiness of the ham but not diminishing the ham flavor.

The most difficult part of this meal is finding the correct sized ham and flavor at the grocery store. Preferably you will want to find a deboned cured Picnic Ham, but more likely you will find a personal deboned ham that is between two to four pounds. Stay away from Maple or Sugared cured hams for the meal will fall short of expectations.The size of your crock pot will determine how much of the ham you will use for this meal.

Ingredients (Large Crock Pot):

  • 2 – 4 Lbs Ham (depending on the size of your crock pot you will need to cut the ham into two or more pieces)
  • 5 – 7 Carrots sliced and cut into thirds
  • 8 – 12 Small Whole Potatoes
  • 1 Cabbage quartered and then halves (8 wedges)
  • 2 – 3 Bay Leaves
  • Fresh Ground Pepper (I cranked the mill twenty times)
  • Water
  • Spicy Deli Mustard or Horseradish Mustard

Instructions:

  1. 6 – 8 hours before you are ready to eat add the prepared ham, potatoes, carrots, bay leaves to the crock pot
  2. Add water to the crock pot so that the ham pieces are well covered
  3. Turn on the crock pot to low and walk away
  4. An hour to an hour an a half before you are ready to eat, place the wedged cabbage on top of the other ingredients in the crock pot then put the cover back on the crock pot
  5. Walk away
  6. With a ladle take out the cooked vegetables and place them on a serving dish
  7. The ham will be intact. Remove from the crock pot and slice to the desired thickness
  8. Serve with mustard

A large crock pot of this meal will feed four adults with extra servings available.

I made the mistake a few months ago of discarding the broth that was remaining in the crock pot. The irony of discarding the broth was that I had been complaining to Stuart that it was difficult to find Ham / Pork Stock or Bouillon in Houston. Stuart reminded me that I could have reduced the broth to a stock. This past time I did just that, but that will have to wait for another post from me.

A North East Scotland Delicacy – Rowies or Butteries

Rowies, Butteries, or Aberdeen rolls are savoury bread rolls, similar to a flattened croissant, but far superior, though maybe ‘slightly’ more unhealthy. There is no real record of their history, but one thought is because of their high-fat content they would have been suitable for fisherman to take on longer journeys at sea, but even onshore they can help give your cardioid-vascular system a shock on a cold, wet Aberdeen morning. Traditional rowies are made using lard, but most commercial bakers now use vegetable oil, which doesn’t taste as good.

Rowies with Jam

Rowies with Jam

The different names for rowies was probably related to different parts of Aberdeen, Aberdeenshire, Banffshire and Kincardineshire, but over time they are now used synonymously.

There are basically two types of butteries, though their recipes are the same. There is the salty, slightly crisp variety and the soft, chewy ones, but you usually have to go to different bakers to find each type. The difference comes down to the method of making them. For the crispy variety some of the fat is left in small lumps rather than working it in completely which causes the lumps to effectively fry the surrounding dough. The secret is to know when to stop working the dough, which apparently is an art as slightly too much will create a flat cake instead of a slightly risen buttery.

I haven’t had a rowie in over a year now, and I feel that I will have to try and make some soon. Here’s the recipe I will be using.

Butteries Recipe Ingredients

  • 1lb (450g) strong plain bread flour
  • 6oz (170g) butter
  • 6oz (170g) lard
  • 1 tsp of salt
  • 2 tsp sugar
  • 1 tbsp dried yeast
  • 1/4 pint (120ml) tepid water

How to make Rowies

First mix the sugar, half the water and the yeast together in a bowl and set aside for the yeast to activate. Sieve the flour and salt into a bowl and then add the yeast. Mix together, adding more water if required to make a smooth dough then kneed for about 5 mins. Place the dough back in the bowl, cover and leave to rise until it has doubled in size, approx 1 hour.

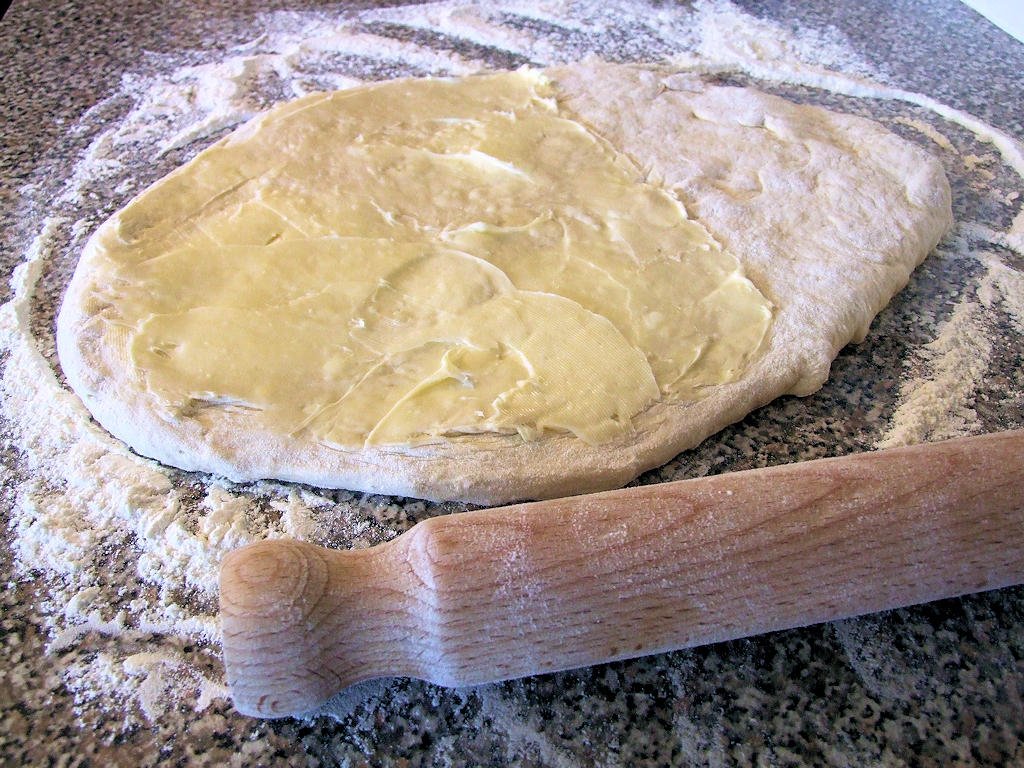
Kneed the dough again and roll it out on a floured surface. Cream the butter and the lard together and then spread a third of it over the dough and sprinkle with flour. Fold the dough into three, roll it out again, spread another third of the fat mixture and then repeat once more.

Rowie dough with first layer of fat

Buttery dough with first layer of fat

Roll the dough quite thinly and cut into 16 equal sized squares. Shape each square into a flattened round, but be careful not to over handle the dough. Place the rounds on a baking tray and leave to rise for approx 40mins.

Butteries ready for the oven

Rowies ready for the oven

Bake the rolls at 450F (230C) for about 15-20 minutes until crispy and golden.

Serve hot or cold with lashings of butter and / or raspberry jam.

Brassica oleracea: Keeping it in the Family

Broccolini on PlateMuch has been written in science, history and cooking on the influence of rice, corn and potatoes, yet the vegetable know by it’s scientific name Brassica oleracea (wild cabbage) is all around us, but few of us realize how often “wild cabbage” is eaten.

Cabbage in a Slow CookerWhen we were in high school and learned about the classifications of animals and plants. Plants and animals are classified scientifically within families and in the plant kingdom there is typically eight classifications. The classifications become narrower and narrower in focus until they define the specific plant with the last two classifications being Genus and Species. Past that you get the the specific Cultivars, Varieties and Hybrids. What makes the Wild Cabbage interesting is that due to the great variety of forms that have naturally evolved there are seven distinctly different cultivar groups, yet all of these cultivars and their subsequent varieties are scientifically the same plant (vegetable).

When former President George Bush Sr. said that he does not like Broccoli, never has liked Broccoli and will never eat Broccoli, I am confident that he has eaten Broccoli, but it looked very different then what he knows.

Broccoli, Cabbage, Cauliflower, Brussels Sprout, Chinese Broccoli are all one in the same. They are all classified as Brassica oleracea, but they are of different cultivars. The scientific world has defined seven cultivars (groups) for Brassica oleracea.

  • Acephala: Kale, Collard Greens
  • Albolabra: Chinese Broccoli (kai-lan)
  • Botrytis: Cauliflower
  • Capitata: Cabbage
  • Gemmifera: Brussels Sprout
  • Gongylodes: Kohlrabi
  • Italica: Broccoli

For one vegetable, it is extremely diverse in the shapes, sizes, color and flavor that it exhibits. One could argue that the tomato is just as diverse with hundreds of tomato cultivars, but with a few exceptions no one would ever confuse a tomato for anything else but a tomato.

There is also the the humorously name Broccolini which is a natural cross between Broccoli and Chinese Broccoli. Also commercially known as Gai Lan or Chinese Kale. This is a very delicate, tender flavored vegetable which I have been using regularly with dinners. I simply steam it for 10 minutes and toss it with salt, olive oil and fresh ground black pepper.

Just when you thought it is all about to make sense, you ask yourself where is the ambiguously named Chinese Cabbage in this list of cultivars for wild cabbage? Interestingly enough, Chinese Cabbage (Bok Choy and Napa Cabbage, two different subspecies) is not classified as a Wild Cabbage (Brassica oleracea). It is classified as Brassica rapa which also includes the subspecies Broccoli Raab / Rapini and Turnip.

In short, Brassica oleracea, the Wild Cabbage in all of it shapes, forms, sizes, colors and too numerous ways to prepare is eaten more often then realized.


Stewie’s Dry Rub for Grub

An American (or maybe just Texan thing) that I have whole-heatedly embraced is using a dry rub when grilling meat, whether in the broiler (grill) or the barbecue. Dry rubs are spice mixtures that are rubbed onto raw meat before cooking to impart flavour and caramelisation, however unlike marinades they don’t tenderise. To begin with I used a shop bought dry rub that contained papain, a tenderiser made from papayas, which had some of the benefits of a marinade. This was a fairly general dry rub and I used it on everything, chicken, fish, vegetables, beef, pork, ribs etc. Once I had become used to using it, I experimented by myself and now have an everyday dry rub that I use on everything. I still include a tenderiser in the mixture, but I had some difficulty in getting a hold of papain, so use bromelain instead, which is an extract from pineapple that does the same thing in breaking down the protein bonds in meat. Though the rub mixture has a lot of spices it only adds a subtle flavour when cooked, while still tenderising and caramelising the meat.

Stewies Grub Rub

Stewies Dry Rub for Grub

Stewie’s Dry Rub for Grub

  • 8 tbsp Hungarian paprika
  • 4 tbsp Salted meat tenderizer (Bromelain)
  • 4 tbsp Chili powder
  • 4 tbsp Packed brown sugar
  • 4 tbsp Celery salt
  • 4 tbsp Ground Cumin
  • 4 tbsp Garlic powder
  • 4 tbsp Ground black pepper
  • 4 tbsp Oregano
  • 4 tbsp Coarse cornmeal


Store in a suitable container in your spice cupboard and sprinkle liberally on everything for a couple of hours before cooking.

Grub Rub Ingredients

Dry Rub Ingredients


Asian Style Orange Chicken

Asian Style Orange ChickenIt may be a little stretch of culinary license to say that this dish is Chinese, but a review of the ingredients makes it difficult to argue that the meal has not been heavily influenced by the use of Asian ingredients.

The history and development of this meal is simple and follows a standard theme for many of the meals created in my kitchen. I was hungry, I did not feel like going to the grocery store and I was not in the mood for restaurant food. So I rooted around until I found what I believe to be the right pairing of ingredients to make a marinade. With the exception Shao Hsing Rice Wine, the ingredients have remained the same. The most notable change is that I have switched from powdered ginger to fresh sliced ginger.

There are many things that make this meal enjoyable. First is that the measurements for the marinade do not need to be exact. Second is that when eaten there is a explosion of flavors that are experienced. You first notice the subtle orange flavor that has been imparted both in the chicken and in the slightly sweet glaze. Then you taste the slight heat of the ginger which is rounded off with the heat of the chili paste that has been tempered with the sugars of the orange and the oyster sauce. No one flavor stands out, but all of the flavors come together in a perfect balance. It is neither to sweet, spicy or salty. The third reason that makes this meal enjoyable is that it is a light meal for the chicken is simply grilled.

The most difficult part of creating this post was the determining the amount of ingredients. As with many of the marinades that I make, the rule of thumb is a little of this, some of that, a dash of this and a heavy hand on that. Based upon how the meal tasted, I think that the marinade ingredients are close to the measurements needed.

Preparing the Marinade (Ingredients)

  • 6 – 8 Skinless / Boneless Chicken Thighs (Breasts are fine, but Thighs are juicier and have more flavor)
  • 6 Crushed Garlic Cloves
  • 1 TBS Sambal Oleok (Chili Paste)
  • 1/2 Cup Soy Sauce
  • 2 TBS Oyster Sauce
  • 1 TBS Sesame Oil
  • 1 TBS Sliced Ginger
  • 2 Oranges Quartered
  • 1 TBS Shao Hsing Rice Wine (optional)
  1. Place a one gallon ziploc bag in a large bowl and add all of the ingredients. When adding the quartered oranges, hand crush / squeeze the juice then drop the quartered oranges into the bag.
  2. Seal the bag and mix the ingredients well.
  3. Add the chicken thighs to the marinade and reseal the bag removing most of the air.
  4. Place bag in the bowl in the refrigerator and allow to marinade for 2 – 8 hours. If possible every few hours reposition the bag in the bowl to ensure that all of the chicken thighs are properly covered with marinade.

Cooking the marinated chicken thighs:

  1. Pull the marinated chicken thighs out of the refrigerator about an hour before cooking so that the chill is knocked out of them.
  2. Heat your skillet or grill to Medium – Medium High.
  3. Remove the chicken thighs from the marinade.
  4. Cook the chicken for 10 – 15 minutes depending on the thickness of the chicken thighs. Remember to turn them frequently for the sugars in the marinade will burn if applied directly to the heat for too long of a period of time.

Serve with steamed white rice and steamed vegetable for a light meal where the flavors of the chicken thighs are the main focus.

Chicken Marinating In Asian Orange Mixture

Chicken Thighs Marinating with Oranges & Asian Condiments