Springtime treat – Green garlic

Springtime is an amazing time for vegetables. New Season vegetables have such fresh, vibrant flavors and mild at the same time, and such a welcome break from the mundane winter crops. One of my favourites is young garlic, or also known Spring Garlic, new garlic, baby garlic, fresh garlic, or green garlic depending where you are in the world and how young it actually is.

Spring Garlic - Also know as young garlic, new garlic, ail frais or green garlic

Spring Garlic – Also know as young garlic, new garlic, ail frais or green garlic

As soon as the first green garlic shoots appear in early spring, you might find green garlic that looks a lot like scallions (green onions, spring onions) which are the most immature stage you will find fresh garlic. These are usually just ‘thinnings’ from the fields to leave room for the rest of the garlic bulbs to mature. At this point you could even eat them raw as the flavor is very mild and fresh. As Springtime progresses, you might see garlic scapes for sale, which are just the green shoots, removed from the garlic bulb to encourage larger growth of the bulb and then bulbs that look more like garlic, but green in colour. These bulbs are have a stronger garlic taste than the earliest green garlic, but still a lot milder than dried garlic.

How to use spring garlic

The youngest green garlic, and scapes are best used like a green onions, chives or baby leeks. Try them raw in salads, make a fresh and zesty pesto, as a garnish for potato salad, stir fried or a fresh tasting spring soup. Once the bulbs have started to appear, but before the garlic has been dried you can bake them whole with just a little butter or olive oil and them crush them onto toasted bread for an amazing mild garlicky snack, or use them like normal garlic, for a fresher, milder taste. Whatever you do with fresh garlic it is best not to keep it too long as it will start to dry out and you’ll lose the fresh, mild, springtime flavor.

Spring Garlic on toasted sourdough

Spring Garlic on toasted sourdough

How to bake Spring Garlic

Total time: 30 mins

  1. Remove any of the outside that has become ‘papery’ and trim any of the stalk that looks tough.
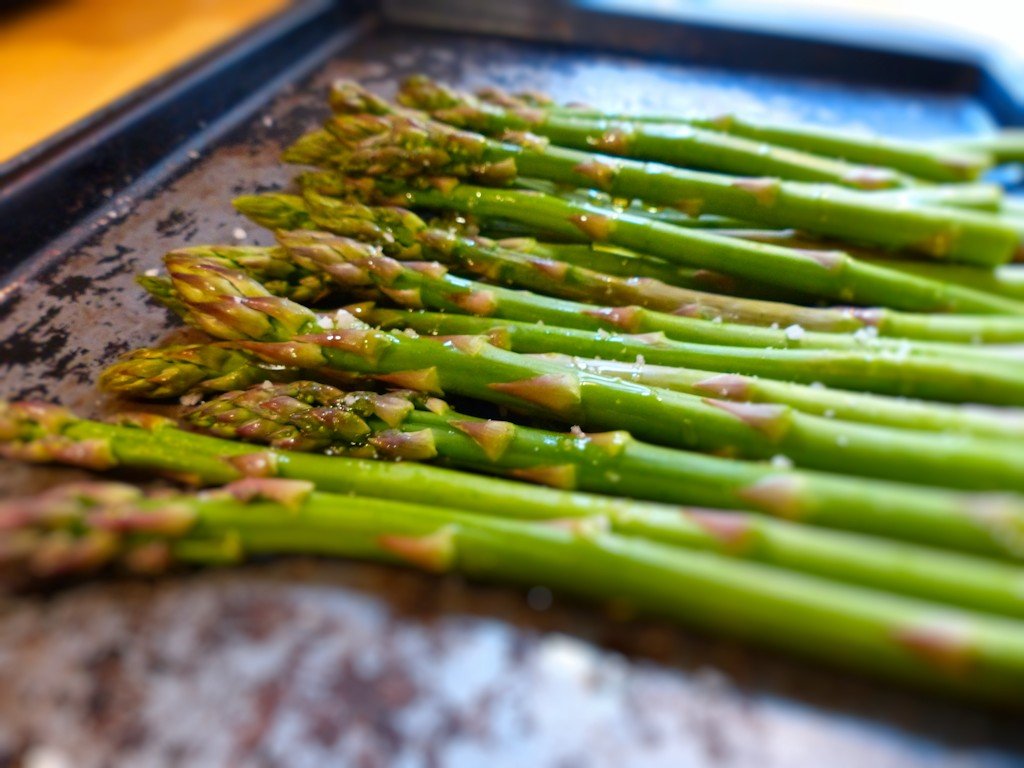
  2. Place the spring garlic on a sheet of foil. Drizzle with olive oil or a few knobs or butter. Season with sea salt and freshly ground pepper.
  3. Wrap the garlic loosely in the foil to create a pocket to help steam them while they bake.
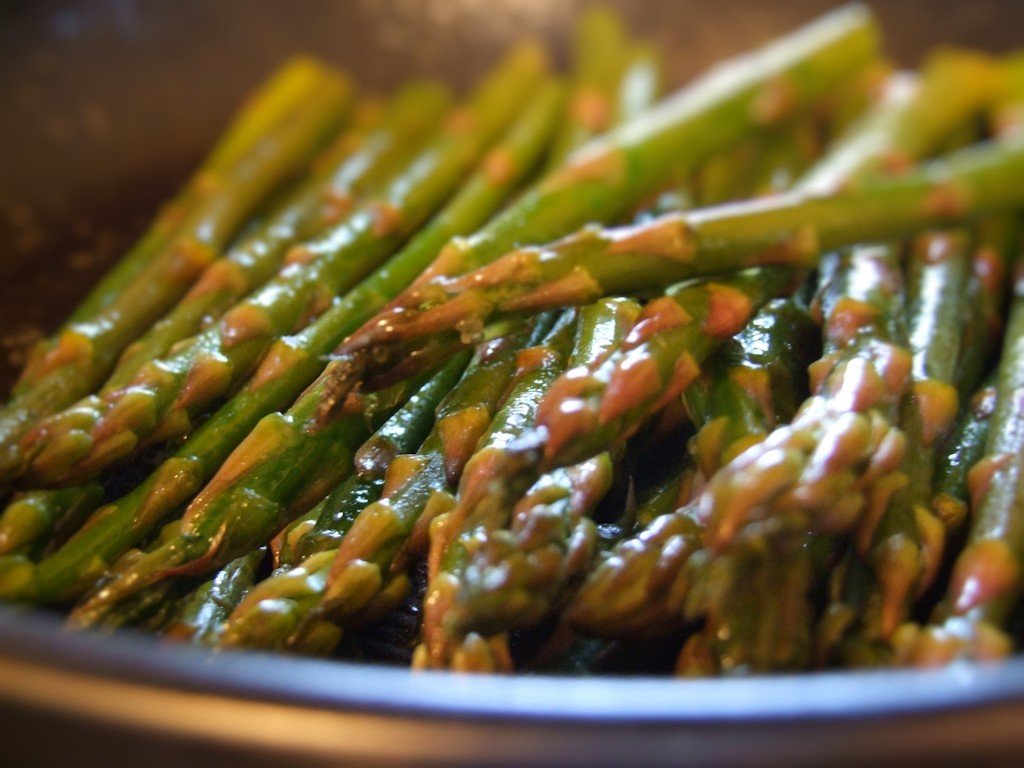
  4. Cook in a 350F (180C) oven for about 30 minutes until the garlic is soft to the touch.
  5. Take a few of the garlic cloves and crush onto toasted slices of bread and enjoy.
Green garlic ready for the oven

Green garlic ready for the oven

Cooking Challenge 1 – Grilling & Barbecue Ideas

Since it’s that time of year again and the grilling season has started, we were thinking that we need some inspiration for some new barbecue ideas and thought we would reach out to everyone. What are you favorite barbecue food ideas for the summer? Do you have a new grilling technique that you want to share with everyone? The come and share your summer barbecue ideas here on Pinterest.

Cooking Challenge 1 - Grilling & Barbecue Ideas

Cooking Challenge 1 – Grilling & Barbecue Ideas

Each Month we will create a new Group Pinterest Board for everyone to share their best recipes, techniques, hints and tips for the particular topic.

Monthly Cooking Challenge Guidelines

  • Pins must be related to the topic given by the board
  • Pins can be from your own website or someone else’s that you think is interesting, or re-pinned from Pinterest
  • Pins can be from old or new posts
  • You can pin as many different posts as you wish (within reason)
  • You can invite others to be able to post to the board
  • No Spam, posting the same post again and again, or irrelevant posts, as they will be removed

Though it is a monthly challenge we will keep the boards open beyond the end of the month

Please share this idea with your friends and let’s get as many new recipe ideas and cooking inspiration.

To join the Pinterest Group Board 

  1. Follow We are not Foodies on Pinterest or this Pinterest Board
  2. Comment on this page asking for an invite (Make sure that you use your Pinterest Email Address for the comment)
    or
    Send your request to join this board to mcc1@wearenotfoodies.com (Make sure that it is from your Pinterest Email Address or include it in your email)
    or
    Comment on this Pin requesting an invite

Have fun and we are looking forward to seeing what cooking secrets that you have.

A British Indian Classic Chicken Vindaloo Recipe thanks to the Portuguese

This chicken vindaloo recipe has been a long time in development, not just in my kitchen, but vindaloo curry is also one of the reasons today why we think of Indian food as hot, not just because of it’s famed heat, but because it owes it origin to Portuguese traders before becoming a British Indian classic curry.

Classic British Indian Chicken Vindaloo Recipe

Classic British Indian Chicken Vindaloo Recipe

If you were to visit India before 1500 or so, chilli peppers didn’t exist there. The hottest spice in the Indian sub-continent at this time was the Long Pepper (Piper longum), which is related to Black Pepper (Piper nigrum). Where Columbus had failed to find a successful sea route to the Indies, Vasco da Gama discovered a route in 1498 and just 7 years later Portuguese traders landed the first cargo of chilli peppers near Goa in the South West of India. It wasn’t long before the chilli became established as a staple of Indian cooking, and even though the chilli came to Europe via the Columbian Exchange, it wasn’t until they started to be imported from India that they became popular and mistakenly thought of as a native Indian plant.

Chilli Peppers

Chilli Peppers

The second part of this food detective story is Vindaloo itself. The original vindaloo curry was derived from ‘Carne de vinho d alhos‘, a Portuguese dish made from pork cooked in wine vinegar with garlic. Over time the dish evolved with different meats being used such as chicken, beef, lamb or duck, and Indian spices such as cinnamon, cloves, Garam Masala were added, and the number of chillies increasing due to the Portuguese love of their fiery taste. The name can easily be seen to be a contraction of the Portuguese for wine vinegar and garlic, i.e. ‘vinha d alhos’ and not the commonly mistaken idea it is named after the Hindi word for potato, ‘aloo’. Though potatoes are common in curries nowadays, the original did not contain any.

Vindaloo Chicken Curry is my ‘go to’ dish to order at any new Indian Restaurant that I visit and I use it as a benchmark for how good I think they are. A good chicken vindaloo should be hot, but at the same time it should be fragrant with spices and it should still have flavor that you can taste despite the heat. Since travelling around the world and being disappointed with a lot of vindaloos that I have tasted, I have developed my own chicken vindaloo recipe that is easy and quick because of my pre-made BIR Base and the pre-cooked chicken and potatoes. Even though this curry is made from scratch it doesn’t rely on bought vindaloo pastes, sauces or powders.

Vindaloo Curry Spices

Vindaloo Curry Spices

Chicken Vindaloo Curry Recipe

Total time: 25 mins
Ingredients

  • 1 lb (450g) of cooked cubed chicken or meat of your choice
  • 12 oz (350g) of cooked cubed potatoes
  • 2 large onions
  • 1 pint (475ml) of BIR Base Gravy
  • 3 tbsp of vegetable oil or ghee
  • 1 tbsp of garlic purée
  • 1 tsp of ginger purée
  • 1 tbsp of tomato purée
  • 1 tsp of red wine vinegar
  • 3 tbsp of hot chilli powder
  • 1 tsp of ground coriander
  • 1 tsp of turmeric
  • 1 tsp of ground black pepper
  • 1 tsp of ground cumin
  • 1 tsp of Garam Masala
  • 1 tsp salt or to taste

Method

  • Gently fry the onions in the vegetable oil, or ghee until golden, but not burnt.
  • Add the garlic, ginger, cumin, coriander, Garam Masala, black pepper, chilli pepper and turmeric to the pan and cook for about a minute to help release their flavors and aromas.
  • Add the BIR curry base, vinegar and the tomato purée. Bring to simmer
  • Add the chicken and potatoes and cook for 10 minutes until hot
  • Serve over rice and garnish with some chopped cilantro (fresh coriander) alongside a garlic naan bread.
  • Though this dish uses chilli powder for speed and convenience, you can add as many chillies as you like to increase the heat as you like.

    Rhubarb Crumble Recipe – The first signs of Spring

    There must be as many recipes for rhubarb crumble as there are cooks in the world, each with their own twist on this Spring time classic pudding. My rhubarb crumble recipe is no different in that I use port to cook the rhubarb to give more depth of flavor to the dessert. Though the rhubarb crumble itself isn’t anything special in the culinary world and there are plenty of other fruit crumbles, the rhubarb crumble is special because it is the first fruit of the year. When I say fruit, rhubarb technically isn’t a fruit, but a vegetable and is the opposite of how we treat tomatoes.

    Rhubarb Crumble Recipe

    Rhubarb Crumble Recipe

    Though rhubarb is treated like a fruit it does come with the drawback of it’s tartness, which can easily be counted with sugar, but try not to drown it in too much sweetness, because the bright, fresh tartness helps waken up your taste buds. Since May is really the beginning of the rhubarb season I’ve been making rhubarb recipes all month and have even had to adapt my crumble recipe to be gluten free for some friends, but still trying to keep the buttery crumbly crust.

    Two Rhubarb Crumble Recipes

    Total time: 1 hour

    Ingredients

    Stewed Rhubarb Compote

    • 1 lb (450g) of rhubarb
    • 3 oz (85g) of granulated sugar
    • 2 tbsp of port or sherry

    Standard Crumble Topping

    • 5 oz (140g) all-purpose (plain) flour
    • 0.5 tsp of baking powder
    • 0.25 tsp of bicarbonate of soda
    • a small pinch of salt
    • 2.5 oz (70g) of butter
    • 1.5 oz (45g) light brown sugar

    Gluten Free Crumble Topping

    • 2.5 oz (70g) of Rolled Oats, processed to a rough oat flour
    • 2.5 oz (70g) of Rolled Oats or steel cut oats
    • 1.5 oz (45g) of butter
    • 1.5 oz (45g) light brown sugar

    Instructions

    1. Remove the ends of the rhubarb stalks and wash them to remove any dirt.

      Rhubarb

      Rhubarb

    2. Chop the rhubarb stalks into 1 inch (2.5 cm) lengths and tip into a pot with the sugar and port.
    3. Heat gently on the stove on a low to medium heat for between 10 and 15 minutes, until the rhubarb is soft, but still holds its shape. Strain the liquid from the stewed rhubarb and return the liquid to the pan. Reduce this liquid down to a thick syrup.

      Reducing the Rhubarb Syrup

      Reducing the Rhubarb Syrup

    4. Tip the rhubarb and the syrup into a suitable baking dish.
    5. For the standard crumble topping mix together the flour, baking powder, bicarbonate of soda and salt together in a mixing bowl. Cut the cold butter into the mixture and then start to crumble it together with the flour between your fingers until it resembles breadcrumbs. Mix in the sugar and pour it over the rhubarb mixture evenly.
      Rhubarb Crumble Topping

      Rhubarb Crumble Topping

      How to make the gluten free crumble topping, mix together the oats and crumble the chilled butter into them. It will be harder to do than a standard crumble topping as it will tend to clump rather than crumble. When the butter has been incorporated, add the sugar and pour over the rhubarb.

      Gluten Free Rhubarb Crumble Topping

      Gluten Free Rhubarb Crumble Topping

    6. Bake in a 400F (200C) oven until the crumble topping is golden brown. This can take between 40 and 50 minutes
    7. Serve with whipped cream or thick vanilla custard and maybe a small glass of rhubarb liqueur.

      Rhubarb Crumble and Custard

      Rhubarb Crumble and Custard

    Once other fruit comes into season you could easily add strawberries to this crumble recipe, though I would probably cut down on the sugar a bit, or later in the summer, apples go very well with rhubarb too.

    How to cook fresh asparagus – 6 basic ways

    How to cook fresh asparagus, let me count the ways. Asparagus is a truly versatile vegetable because it can be steamed, microwaved, roasted, blanched, grilled, broiled, sautéed and even eaten raw. Though the list seems impressive there are clear winners for the various methods for cooking fresh asparagus that help to retain its subtle flavours. This post will go through all of the different methods to cook asparagus you show you the best way to cook asparagus. The Best way to cook asparagus is using oil instead of water. For more details on why cooking asparagus using oil is the best way

    How to cook fresh asparagus

    How to cook fresh asparagus

    6 Basic Ways How to Cook Fresh Asparagus

    Each of these methods depending on having fresh asparagus with a fairly even diameter to ensure that they are cooked roughly at the same time and preventing them turning mushy. The various methods can be separated into two groups, water based cooking methods and oil based cooking methods. The first three methods will be oil based and the next three will be water based.


    Roasting Asparagus

    Roasting Asparagus

    Roasting Asparagus

    Cooking asparagus in oven is a very convenient method that means you can easily be doing other things without tending to it all the time. Roasting gives you a large degree of control over how cooked you like it from barely cooked to tender to well done, as well as giving a wonderful roasted flavour to the asparagus.

    • In a large bowl drizzle a little olive oil over the prepared asparagus and toss to ensure even coating.
    • Layout the asparagus on a baking sheet in a single layer to ensure even roasting
    • Sprinkle generously with salt and freshly ground black pepper
    • Roast at 400F (200C) for between 12 and 15 minutes depending on how tender you wish your asparagus to be.


     Grilling Asparagus

    Grilling Asparagus

    Grilling Asparagus

    Grilling / Barbecuing asparagus is very fast, tasty and easy method of cooking. It might help to invest in a vegetable grilling basket to make it easier to turn the asparagus instead of doing it one at a time with tongs.

    • Drizzle a little oil over the asparagus and coat evenly
    • Season with salt and pepper
    • Place the asparagus spears directly over medium heat coals or burners and close the lid.
    • Cook for 3 to 4 minutes and then turn the asparagus.
    • Again close the lid and cook for a further 3 to 4 minutes for crisp and tender asparagus.


     Sautéing or Pan Roasting Asparagus

    Pan Roasting Asparagus

    Pan Roasting Asparagus

    In my opinion this is the best way to cook fresh asparagus and the method I use the most often. Sautéing the asparagus on the stove is relatively quick and simple, but the best benefit is that it maintains all of the lovely asparagus flavour.

    • Heat olive oil in a skillet over a medium heat
    • Once the oil is hot add the asparagus and season with salt and pepper
    • Move the asparagus frequently in the pan to prevent burning and cook for 3 to 4 minutes until cooked.


     Boiled Asparagus

    Boiled Asparagus

    Boiled Asparagus

    Out of all the ways to cook asparagus, boiling is the worst way if you want to preserve the subtle flavour as the flavour compounds are water soluble and are lost when you pour away the water. Though this method is commonly used in restaurants I recommend not boiling your asparagus. However here’s the instruction if you really want to do it.

    Note: Do not use an aluminium pot as this can taint the flavour of asparagus

    • Boil water with a little salt in a large pan.
    • Submerge the asparagus in the water,
    • Cover and leave to cook for 4 to 7 minutes depending on the diameter of the asparagus.
    • Serve


     Steaming Asparagus

    Steaming Asparagus

    Steaming Asparagus

    Though this method of cooking asparagus isn’t nearly as bad as boiling, I still think that it is an inferior method of cooking that does not do the flavour of the asparagus any justice.

    • Put 1 inch (2.5cm) of water into the bottom of your steamer pot and bring to a boil
    • Place the asparagus into the steamer basket, cover and cook for 4 to 6 minutes until tender
    • Remove the asparagus from the steamer and serve


    How to cook asparagus in the microwave

    How to cook asparagus in the microwave

    How to cook asparagus in the microwave

    Microwaving asparagus is quick and very convenient, and though not as bad as boiling, it isn’t as good as cooking with oil.

    • Season the asparagus with salt and black pepper
    • Wrap the asparagus spears in damp paper kitchen towels and place onto a plate.
    • Put the plate into the microwave and cook on high for 2 to 3 minutes

    Alternatively you could use the microwave to get a better result than steaming in paper towels, by placing the asparagus in a dish and a few knobs of butter and then cooking it on high for 2 to 3 minutes.