
The process of making yogurt at home is not so much a recipe as it is a very simple process and some waiting. I’ve been making a large jar of homemade yoghurt every week, or yogurt as you Americans call it, for about 2 years now, long before the pandemic. I think I saw a video online from Priya Krishna about making homemade yoghurt and never realized how simple it was. All that is needed is two ingredients, fresh whole milk and some good plain yogurt. The cool thing is you only need to buy yogurt once and you use a little of your own as a yogurt starter for the future. Not only does making yoghurt at home save lots of money, you will know exactly what is in it going forward.
Making Yogurt at Home
Since the pandemic, lots of people are looking for distractions as well saving money or being more health conscious, hence the craze in making sourdough bread at home. In some ways making yoghurt is similar in that you use a starter to ferment and create something that is not only delicious, it has potential health benefits as well as the huge number of recipes you can use it in such as tzatziki, curry, or spooned over fresh fruit. I had seen an uptick in people making their instant pot yogurt, which is a simple way to do it, but the method I use is fairly simple too and the only special piece of equipment is a Thermos or Vacuum Insulated Flask or bottle.
A quick note on milk
Though it is possible to make yogurt from other types of milk, including vegan nut milks or low fat milks, I haven’t experimented with them and only use fresh organic whole cows milk. Honestly having a little full fat milk in your diet isn’t all that bad and the full fat whole milk is so creamy and delicious you will really be missing out. The milk I use is pasteurized & homogenized because that’s all I can buy easily, but I have use low pasteurized, un-homogenzied before and the end result is exactly the same. Since you will be saving money by making your own yoghurt, buy the best quality milk that you can find easily.
The science of yogurt
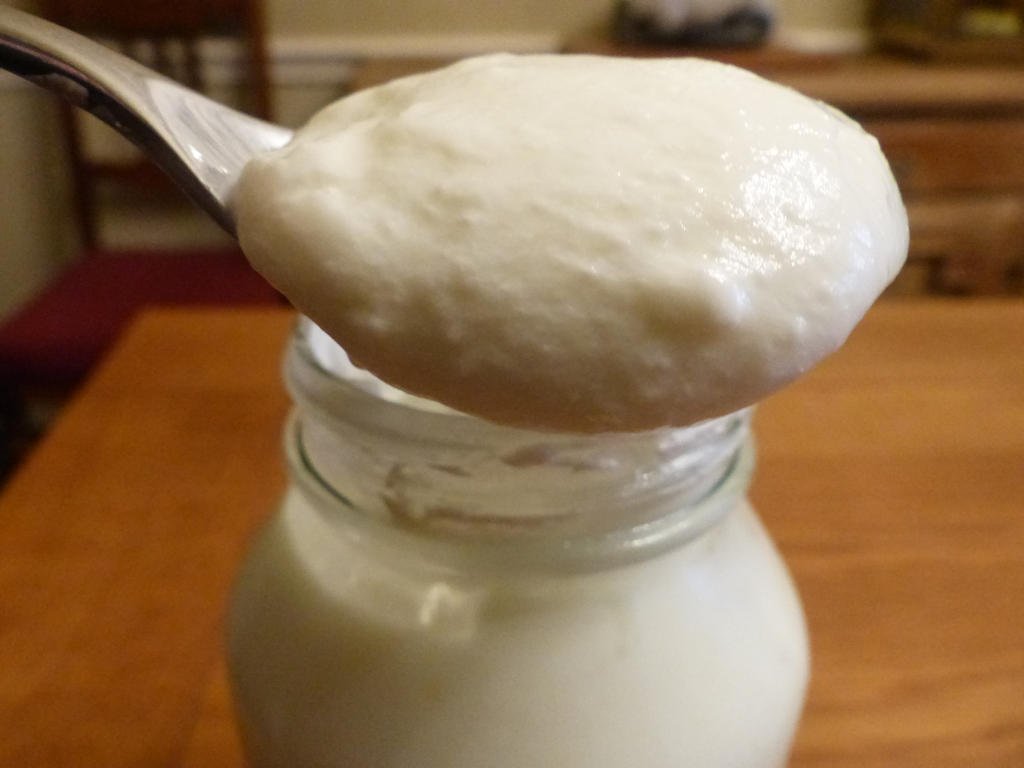
Though the process of making yogurt is simple, what goes on while waiting for it to be ready is really interesting. The word Yogurt comes from the Turkish root word ‘yog’ meaning to condense, which is what happens when the milk curdles because of the bacteria. The bacteria in yoghurt are actually a culture of Lactobacillus delbrueckii subsp. bulgaricus and Streptococcus thermophilus bacteria which when introduced to lactose in the milk, act upon it fermenting the sugar into lactic acid which in turn coagulates the proteins in the milk and produces the distinctive tang.
Overview of making yogurt
The milk is gently heated to just under the boiling temperature. This serves two purposes. One to kill any unwanted bacteria in the milk and two to denature that proteins in the milk to heat the coagulation of the yogurt. The milk is the cooled to roughly 113F to 116F (45C to 46.5C) before adding some pre-made yogurt. It is then kept warm for a few hours before it is decanted into jars and then stored in the fridge.
Some tips to make the best homemade yogurt
• For you yogurt starter find a friend who makes their own yogurt and ask for some of theirs, or buy some good quality whole milk yogurt at the store. Just make sure that it doesn’t have any other ingredients in it and it contains ‘live active cultures’
• To make the whole process simpler try and find a jar or jars that are the same volume as your vacuum flask. My flask is roughly 32 fl oz (950ml) and so are the jars I use. This makes the measuring of the milk very easy. I just fill the flask with fresh milk and then pour it into the pot. Simple and less washing up. The recipe below is based on my flask and jars, so amend according to your equipment.
• While heating the milk, be careful not to scrape the bottom of the pan, as some of the milk may have scalded or scorched and you don’t want to release it because you’ll end up with brown, burnt bits of milk in your finished yogurt.
• If you don’t have a thermometer, you can guess the temperatures. Heat the milk to the point before it boils. It should be steamy and foamy, but not bubbling. To roughly find the cooling temperature before adding your yogurt, try sticking a clean finger in it and hold it there for about 10 seconds without it becoming uncomfortable.
• To cool the milk you can either allow to do it naturally (probably about half an hour) or the method I use, is to prepare a bowl, larger than the cooking pot, half fill it with cold water and ice. Put the pan in the cold water bath and monitor the temperature while it cools.
• Once the yoghurt is ready to pour into jars, you may need to stir it using the handle of a long spoon to help it come out of the flask. Also a large canning funnel helps with the pouring of the yoghurt into the jars.
• The fermentation of the yogurt in the vacuum flask needs a minimum of 4 hours, but I find leaving it for 12 hours is easier and gives the right amount of tang. I either start the process about 9am so it is ready to decant into jars at 9pm before bed, or I start the process at 9pm, so that it is ready to decant in the morning.
• Your homemade yogurt should easily keep in the refrigerator for 2 weeks. Just remember to keep a little as the starter for your next batch.
• If your yoghurt is not setting after it has be made, check your temperatures during the process. Also sometimes I’ve noticed that if I change the brand of milk, it takes a couple of times before the started becomes happy with the new milk. The worst case scenario would be that your starter has become exhausted. The simple answer is to buy some new yogurt and start again.
• Have all you equipment and ingredients ready and laid out. Mise en place!
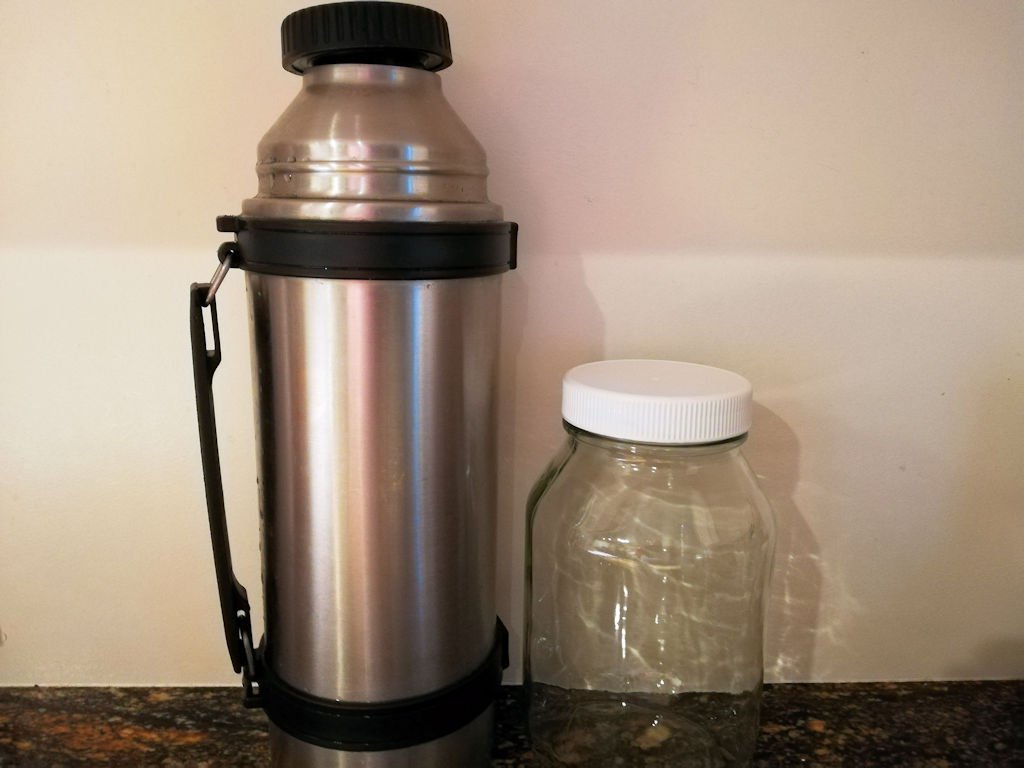
Vacuum Insulated Flask and Jar for making yoghurt
Making Yogurt at Home
Ingredients
• 32 fl oz (950ml) of Fresh Whole Milk
• 4 tbsp of pre-made Yogurt
Equipment you will need
• Thermos or Vacuum Insulated Flask
• Jars
• Mixing Spoon
• Thermometer
• Pot
• Bowl
• Funnel
Method
- Measure your milk. The easiest way is to use your vacuum flask.
- Fill the flask with hot water and seal it with its lid.
- Pour the milk into a pot and gently heat it over a medium heat.
- Stir gently during the warming.
- Once the milk reaches between 180F (82C) & 190F (88C), adjust the heat and hold the warmed milk at this temperature for about 5 mins, gently stirring.
- Pour out the hot water from the flask.
- Remove the milk from the pan and allow it to cool to between 113F to 116F (45C to 46.5C)
- Add the pre-made yoghurt and stir into the cooled milk to ensure that it is thoroughly dissolved.
- Using a funnel, pour the milk/yoghurt mixture into the flask and seal it with its lid.
- Leave the flask for about 12 hours (at least 4 hours)
- Pour the yoghurt into clean jars, seal and put into the fridge to cool.
- Enjoy for the next two weeks and remember to keep some yogurt for making your next batch.

- Whole Milk

- Instant Read Digital Thermometer

- Stainless Vacuum Insulated Flask

- Organic Whole Milk Bulgarian Yogurt
